Summer’s long gone up here in Yorkshire…
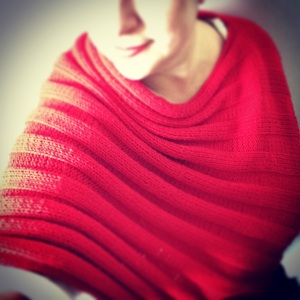 At last I can see my breath on the morning air and my thoughts turn to mugs of cocoa, the smell of baking bread and of course my fingers turn to poncho-knitting.
Keeping it simple after a month (and a bit) of summer silence on these pages and hoping to bring you all a little autumnal cheer with this free pattern for the simplest poncho. I used 11 x 50g balls of Debbie Bliss Mia in Ruby – just because I had some in my stash but any DK weight yarn would work for this easy-peasy project – you’ll need around 1,100 meters in all.
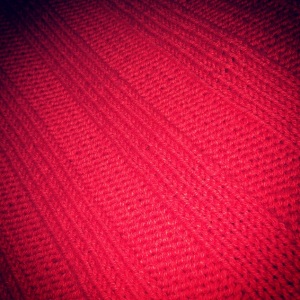
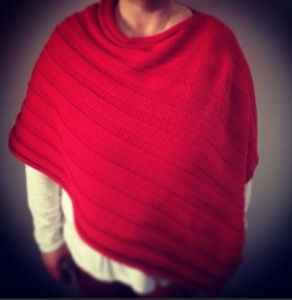
The concertina effect happens around the neck line without any effort at all – it’s the stitches that make that magic happen without even thinking about it.
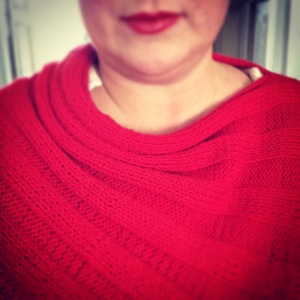 I love the way the folds just sit in a relaxed way around the neck but I must confess to blocking the whole thing so that the folds don’t take over completely!
I’m an ample woman but I think this will pretty much suit anyone – make the neck opening smaller or larger if you need to and it’ll be fine and dandy even on the most petite of frames.
So here’s what I did…
Using any DK yarn and 4.5mm needles cast on 120 stitches. (I used the long-tail cast-on over 2 needles held together because I know my cast-on tension is tight).
Row 1
*purl 5, knit 5 and repeat from * to end of the row.
All subsequent rows – repeat Row 1 until you have a piece of fabric that is 56″ long – it’ll take a while but you can binge-watch Netflix cos it’s dead easy…
Cast off loosely.
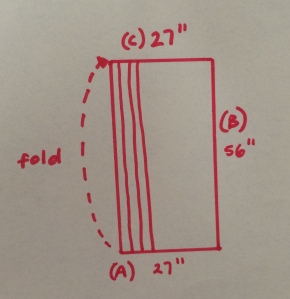
Block to about 27” or 28″ wide and keep your 56″ length. Do this by pinning (I use blocking pins) out your fabric to the desired size which flattens out the concertina effect stripes of the fabric you’ve just knitted. I block using interlocking foam play mats I bought on Amazon. Then spray the fabric with a mixture of water and Soak Wash or Eucalan and wait until completely dry before removing the pins.
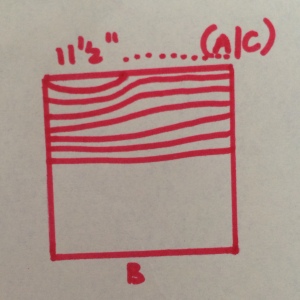
With the wrong side facing you, fold A over to B and using mattress stitch sew along what will be the top of your poncho (indicated by the dotted line) leaving about 11.5″ for a neck opening.
Download the pdf here: Easy-Peasy Poncho Pattern
Sorted!
I think I might make some more of these – they’ll keep me toasty warm right through to late Spring next year…
Happy Days indeed
Tina x

I love this Tina – absolutely beautiful. May even have a go at making one 😊
LikeLiked by 1 person
Yay! Another KAL? Shhhhhhhh….
LikeLike
It’s a lovely poncho. We would like to make it for little girls (5 to 10 years). What would the pattern be? Thank you.
LikeLike
Hi Lynn and Linda
So glad that you like the poncho. I haven’t made this for a child, it’s a pattern for adults, but I would think that if you cast on 60 sts, work the 5 purl, 5 knit pattern and keep going until you have a rectangle that is approximately twice as long as it is wide (when you stretch out the concertina ribs a little), then it will be about right. The hole you leave for the neck would be smaller too but that’s easy to measure against the child – just make sure she can get her head through the gap!
I haven’t tested this on a child so it’s really a bit of guess work. I would also think that you simply halve the amount of yarn you would need – so around 500-550 meters.
Do let me know how you get on and good luck!
LikeLike
Also, how much yarn would we need???
LikeLike
Thanks Tina. We we do make the poncho we will certainly let you know. The girls we are making it for don’t live in the USA, so size is tricky to measure. BTW, what is 500-550 meters in yarn yards?
LikeLike
It’s about 550-600 yards…
LikeLike
I am confused by the construction. Can you make it more clear?
LikeLike
Hi Karen – sorry I have confused you. Which bit are you finding difficult? I’ll try to help…
LikeLike
Im not sure which side to fold over and sew up for the neck.
LikeLike
OK – gotcha! If you look at the photo of me wearing the poncho you may notice that the ‘stripes’ go across my neckline and body. So – with the rectangle laid down flat in front of you and the long side lying horizontally, fold the rectangle in half so that the short side stays the same depth. You then stitch the longer of the new sides from the edge towards the fold, leaving as much of a hole for the head to go through as you would like. Ta dah! I hope that now makes sense – looking at the photos again will help too. If you still can’t quite make sense of these directions – send me an email to crochetworkshops@gmail.com and I’ll take a few pics to illustrate again, or maybe I could even film a tutorial? Thanks for sticking with it 😀
LikeLike
That helped, thanks for the quick response.
LikeLike
would the neck hole be large enough if I knit it in the round?
LikeLike
I’m not sure what you mean Pam. Do you mean to knit the whole thing in the round?
LikeLike
since we are knitting this piece on circular needles I would prefer to join at the neck and knit the whole piece in the round. Will doing this work with your pattern?
LikeLike
Hi again Pam – I use circular needles only because the weight and bulk of the knitted garment would be awkward to hold on straight needles. I don’t believe that the poncho can be knitted in the round…
LikeLike
Okay, thanks for saving me angst and time I will do it your way. 🙂
LikeLiked by 1 person
Brilliant! Would love to see a photo when you’re finished. There are now a few on Ravelry – which is so exciting for me😊
LikeLike
Thank you Tina! Made this in a gorgeous wheat color for my niece for Christmas. The pattern is so effective – I love when I look way more talented than I am! 🙂 Happy New Year!
LikeLike
I know what you mean! So glad that the pattern worked for you and would just love to see photos on Ravelry if you’re on there. Happy New Year and here’s to a year full of knitting and crochet x
LikeLike
What size does the 120 Co stitches make?
LikeLike
It should block to about 27 or 28 inches wide – which is mentioned in the pattern on the rough (very rough) drawing. If you decided not to block your fabric, the stitch pattern will pull the fabric considerably shorter and will concertina quite a bit. If you like that look I would suggest casting on another 20-40 stitches so that the fabric will be long enough to give you a bit of drape. Hope that helps…
LikeLike
Love the look of this poncho…but I have had issues with circular needle – would it be possible to do it on straight?
LikeLike
Absolutely! I use DPNs so that the large number of stitches feels more manageable – I use them like floppy straight needles really, just working the stitches from one needle to the next but straight needles are fine if all your stitches will fit. I hope that is helpful.
LikeLike
Thanks….now I can’t wait to get started!! 🙂
LikeLike
Love this! Thanks for sharing the beauty & your skills.
LikeLike
Thank you so much. I am a very bad blogger indeed but I am planning a return soon with a very simple crocheted cushion cover 😀 x
LikeLiked by 1 person
Can you clarify for me is it knit 5 rows, then purl 5 rows or k5,p5,k5 etc in the same row
LikeLike
Hi Lori – it’s Purl 5, Knit 5 etc in the same row – like one giant rib I guess!
LikeLike